Commentary Prepared by Dr. Julia Lenaghan, Ashmolean Museum
A 036
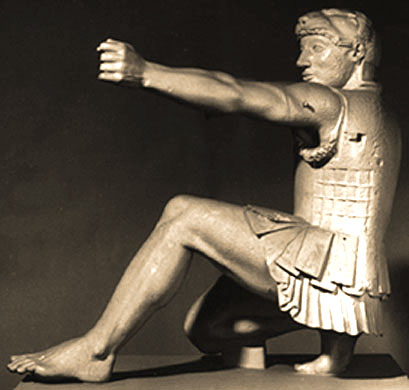
Archer ("Herakles") of the East Pediment of the Temple of Aphaia at Aigina. Munich
Marble
Pedimental Figure
80 cm from ground to top of the lion's skin
From Aigina. The main portion of the statue was found with in 1811 directly in front of the east side of the Temple of Aphaia. It was found with the attacking figure of the proper left (II “Priam”), the attacking figure’s staggering opponent (III), the helper of the proper left (IV), and the dying warrior of the proper right (XI “Laomedon”). It was closest to the helper. The left hand of the statue was also found in 1811 but there is no indication of where. The end of the right foot and the fragment of the left lower leg were both found in 1901, the foot northeast of the altar and the leg fragment at the altar.
Germany, Munich, Glyptothek, 84 and 150
ca. 480-470 BC
Preservation:The statue is preserved in the following three (A-C) segments which are composed of a total of twelve pieces:
A) Upper part of the torso with remnant of the separately added right shoulder piece and remnant of separately added piece of the cuirass on the left, the head with part of the separately added left cheek guard and fragments of separately added canine teeth of the lion’s jaw, the lower part of the torso with the right leg up until the heel and the left leg to the knee, two fragments of the right upper arm and elbow, and the left arm (11 pieces)
B) Left hand (1 piece)
C) End of the right foot with piece of the plinth (1 pieces)
A fourth segment, D, has been assigned to the statue with some reservation by Ohly. It is a fragment of the left lower leg (1 piece). Segments A and B are in Munich; segments C and D are in Aigina.
With the exception of a small part of the cuirass and helmet, the statue was completely restored by Thorvaldsen who inclined the statue backwards. Thorvaldsen added the nose, the right forearm with the hand, the left hand with the wrist and a bow, the end of the right foot, the left lower leg with the foot, the greater part of the support under the right shin, and some missing parts on the chiton and cuirass. An area in the left buttock was drilled out so that the statue could be attached by an iron rod to a rectangular plinth. (The Ashmolean Cast preserves the Thorvaldsen restorations.)
Thorvaldsen’s restorations have been removed and the following restorations are now in place: The left wrist, nicks at the back of the cuirass, the middle part of the right foot, and the boss under the right shin the beginning of which on the shin is original. The break surface at the nose which was smoothed down in Rome has been covered and the hole in the left buttock for the iron rod has been filled in. A cast of the tip of the right foot (now in Aigina) has been to the statue in Munich.
The statue is weathered more on the left side of the body than the right. The surfaces which were painted are also better preserved; these include the eyeballs, the mouth, the lion’s head, and back part of the helmet.
Description:The statue depicts an armored man who squats and draws a bow. The right leg of the figure is folded over itself. The thigh projects outwards and downwards from the body; the knee almost touches the ground. The lower leg is pressed against the thigh. The remains of a strut which connected the lower leg to the ground are visible on the upper portion of the shin bone. The right foot is tensed and bent. The toes and ball of the feet are flat on the ground but the heel is raised and the back of the ankle touches the buttock. The left thigh projects outwards and upwards from the body. The leg bends at the knee and the no longer extant lower leg projected yet further from the body and was lowered. At least the heel of the left foot must have touched the ground.
The upper body is erect. The left arm is outstretched, pointed slightly to the left, and remains at shoulder level. The head turns towards this shoulder. The right arm is also raised to shoulder level and extends forwards. It is bent at the elbow.
The statue wears a chiton and a leather cuirass over the chiton. The chiton appears out from under the cuirass at both armpits and on the thighs. Under the left armpit, the folds of the chiton are bunched together and have volume. Under the right armpit the folds and even a small clothing weight are depicted but without volume. They are flattened against the body. Because the shoulder flap of the cuirass is lifted in order to allow the right arm to move, a corner of the chiton, again depicted flatly, is visible on the upper part of the right shoulder. Around the thighs and buttocks the chiton hangs in broad flat folds. It hangs further down on the left side of the body than on the right side where it is caught between the right thigh and right lower leg which are doubled over themselves.
The leather cuirass of the figure featured a collar piece, an area of cords below the left armpit, and a series of rectangular flaps that hang from the waist. An ordinary leather collar piece consisted of a raised neck guard and flaps over the front and back of the shoulders. Thus, the upper border was cut on both sides of the neck so that on either side of the neck the pieces would fold over the front of the shoulders. These pieces were held down by a string tied to the chest area. In contrast, the piece behind the neck remained raised. In this statue the piece behind the neck was worked separately and attached at the base of the back of the neck where there is a large dowel hole below the bottom edge of the helmet. The left shoulder piece of the collar is flatly depicted and reaches down over the left breast. Its details and string would have been painted. The right shoulder piece was raised and, therefore, separately worked. There is a rectangular cutting and a rough picked surface on the back of the shoulder in which a fragment of the separately worked raised right shoulder piece remains. Below the shoulder blades on both sides there are rough picked, stepped-back, almost rectangular areas that have a dowel hole on their upper border. On the left side the marble attachment pin still fills the dowel hole. At these points the part of the collar piece which covered the back of the shoulder would have been added separately.
Below the left arm pit is the seam of the cuirass and group of cords, five horizontal and three back. The cuirass wrapped from the left side around the front and back of the body and rejoined itself at this seam. The cords, presumably tied somewhere on the front of the cuirass, allowed the wearer to adjust the size of the cuirass. The bottom portion of the cuirass consists of two tiers of leather flaps. Eleven flaps, which are now missing, were worked separately and attached by means of dowel holes and small drill holes. Finally the figure almost certainly wore a quiver. A large dowel hole on a leather flap under the cords and a nail hole on a flap again under the cords but to the left of the larger hole seem to have been used for the attachment of the quiver. The strap of the quiver, perhaps in metal, would have crossed the body diagonally from the left hip to the right shoulder. A drill hole in the back of the right shoulder just before the raised shoulder flap may have served to secure the strap.
The head of the figure, which turns over the left shoulder, wears a Chalcidian helmet which leaves the ears uncovered and has a neck protector with a flaring edge. In front of both ears are slots for attachments with a smooth surface above them. These served for the addition of the hinged cheek pieces which were obviously in a raised position. A fragment of the piece remains in the slot in front of the left ear. The front of the helmet is covered by a lion skin, the muzzle of the which rests directly over the center of the brow. A row of snail curls appears below the open jaws and teeth of the lion skin. The mouth of the lion has four small central teeth in line with the man’s nose. Flanking these teeth on each side were separately added long canine teeth, parts of which remain on both sides.
The face of the man himself has a broad rectangular shape. The forehead is framed by the almost horizontal line of snail curls and above that the lion’s upper jaw which come down low on the brow. The eyebrows follow a regular high arch. The upper lids of the eyes follow the same arch and project; the lower lids, in contrast, are more horizontal. The cheeks project below the eyes and there are shallow furrows in the region of the naso-labial folds. The mouth is large and the lips are full and shapely. The corners are tucked into the cheeks so that the lips appear to project. The upper lip has a distinct central dip. The chin is solid and broad.
Discussion:For a full discussion of the history, both ancient and modern, of the sculpture from the four pediments of the Temple of Aphaia at Aigina, see the entry concerning the central figure of Athena from the West Pediment (cat. A 29). This statue belongs to the East Pediment which is stylistically later than the West Pediment in both its total construction and its individual figures. It features fewer figures (eleven rather than thirteen) and the action converges towards the center instead of moving outward in small groups. The bodies and heads of the figures are more naturalistically and freely rendered.
This kneeling archer was the second statue in from the proper left corner of the pediment. The bottom blocks of the pediment, the figure’s lack of height, and the weathering on the left side of the figure make it clear that this was the figure’s original position.
The figure is extremely important since he provides the crucial clue for the interpretation of both pediments. Because he wears a lion skin, the statue is must be identified with Herakles or one of his sons. From various odes of Pindar we learn that Herakles himself had a link with the Aiakidiai,- he aided his friend and relative Telamon, the son of Aiakos, in the first siege of Troy. Thus, the figure on the pediment is most likely to represent Herakles himself. Moreover, we know from Pindar that in that first siege of Troy Herakles killed Laomedon, the King of Troy, with an arrow. This appears to correspond to the action of the pediment where the archer wearing a lion skin appears to shoot and kill the bearded figure in the proper right corner of the pediment. Therefore, the East pediment is usually interpreted as the First Trojan War, and consequently the West pediment is interpreted as the Second Trojan War.
The statue was among those originally restored by Thorvaldsen. When the tip of the right foot was found in 1901 it became clear that Thorvaldsen’s restoration was slightly incorrect. The more vertical position of the original right foot gives the statue a more upright posture than the restoration of Thorvaldsen which showed the figure leaning back.
On stylistic grounds Ohly believes that the sculptor of the statue was not the same as the sculptor of the “Attacking” and “Staggering Warriors” of the center of the proper left side. Both those figures, in his opinion, feature a more organic movement. This figure is more static and heavily built and resembles the figure of the “Helper” (cat. A 35) directly adjacent to it. Both of these figures he assigns to a sculptor whom he calls the “Herakles Master.”
Bibliography:A. Furtwängler,
Aigina. Die Heiligtum der Aphaia (Munich 1906) pp.250-252 K nos.86-88 pls.96-101 figs.206-208
description of statueD. Ohly,
Die Aegineten I. Die Ostgiebelgruppe (Munich 1976) pp.60-74 pls.30-34, 35d-e, 25, 75, figs.52, 54-59, 65
extremely detailed technical description of all aspects of the statue