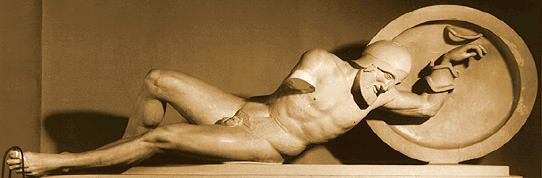
Fallen warrior, with a shield on his left arm.
Commentary Prepared by Dr. Julia Lenaghan, Ashmolean Museum
A 031
Dying Warrior from the proper right corner of the East Pediment of the Temple of Aphaia at Aigina. Munich
Marble (Parian)
Pedimental Figure
L 1.785 m
From Aigina. Found at the Temple of Aphaia. The central portion was in found in front of the east side of the Temple of Aphaia at Aigina with an attacking figure (E. II), his falling opponent (E.III), the helper from the proper left side (E.IV), and Herakles (E.V). Section C was found in the Propylon and sections B and D, found respectively in 1811 and 1901, are without findspot.
Germany, Munich, Glyptothek, 85 and 130
ca. 480-470 BC
Preservation:The statue now stands in four (A-D) separate sections each made of numerous fragments. Sections A-B are in Munich and C-D are in Aigina. ction A, the greatest part of the statue, consists of the following 41 pieces:
- Head and upper part of the body with the left upper arm, right shoulder, and fragment of the cheek piece (total 2 pieces)
- Right arm, right hand, section of the sword hilt (total 3 pieces)
- Left forearm with shield band, piece of the shield, and left hand with thumb (total 2 pieces)
- Shield fragments (total 21 pieces)
- Underside of the body with an ancient repair in the right gluteus (total 2 pieces)
- Fragmentary right thigh (total 3 pieces)
- Fragment of the left hip and pubic hair (total 1 piece)
- Fragmentary left thigh with the testicles and fragment of the penis (total 2 pieces)
- Left knee with piece of the thigh (total 1 piece)
- Left lower leg (total 1 piece)
- Left foot with two fragments of two toes (total 3 pieces)
Section B is composed of the right foot with a piece of the right lower leg (total 3 pieces). Section
C is the calf of the right lower leg (1 piece) and Section D is a portion of the right knee.
The statue had been restored by Thorvaldsen. The Ashmolean Cast preserves most of Thorvaldsen’s restoration although the right arm has fallen off. Thorvaldsen’s restorations, now removed, included all the missing parts of the body, significantly most of the right leg (a piece of the thigh, the knee, the lower leg and foot), the crest of the helmet, and the nose guard. Ohly criticizes the work strongly, noting that not only were break surfaces of missing parts smoothed down but also damaged surfaces were repaired on the Parian marble in glaring Carrara marble. Three serious errors of the Thorvaldsen restoration include (1) failure to realize that the right hand which fell hung over and below the plinth, (2) showing the right leg too steeply bent, and (3) not realizing that the right foot, supported by a dowel, was raised in the hair.
Thorvaldsen’s restorations have been removed and on the statue now are only the missing parts of the lower body, thighs, and shield have been restored. The right lower leg and the knee fragment, both in Aigina, have been added by means of a plaster cast to the figure in the Glyptothek.
Description: The statue depicts a bearded warrior who, having fallen to the ground, twists in a final attempt to gather his strength. From the navel to the feet the body is at a 135 degree angle from the ground line. Only the back part of the exterior of the left gluteus touches the ground. There is in fact a large dowel (9 x 7.5 x 5.7 cm) here that attaches the figure to the pediment floor. The left leg, with its outer side running next to the ground, bends slightly. The left foot remains at a 100 degree angle from the leg and points at the viewer. The toes extend beyond the edge of the plinth.
The right leg is bent at an almost 90 degree angle. The upper part of the leg slants upward and the lower part slants downward; the knee is the highest point. According to Ohly’s restoration the foot, parallel to the front edge of the plinth, remains raised, hovering in the air. Ohly restores it this way because the heel is worked fully in the round and does not seem to have been flattened against the ground. The entire leg leans toward the left leg which is in front of it and below it. The scrotum rests on the inside of the left leg and the left testicle rolls slightly forward. The penis itself was worked separately and inserted.
At the waist the torso, which is propped upward on its left arm and shield, twists violently toward the right. It turns a full 90 degrees from the legs. Thus, above the navel one finds the side of the rib cage. The chest is almost perpendicular to the ground. The right arm is lowered. It bends at an approximately 90 degree angle and reaches across the chest. The elbow extends about 11 centimeters outward from the edge of the plinth. The hand, which held the hilt of a sword, falls over and below the plinth. In the hand there is the iron pin to which the blade and the end of the hilt were attached.
The left upper arm is raised and remains virtually parallel to the ground at shoulder level. The forearm, extending upwards, forms a 90 degree angle with the upper arm. It passes through the broad shield band. The upper and lower edges of this band are raised and have central apices. The hand of the left arm has, however, dropped from the higher shield grip and limply falls. The shield itself is fastened by one boss or strut into the ground and by another into the left shoulder. It has various holes on the inside of it which appear to have been for the attachment of decorative elements and two arrows near the bottom edge.
The body is naturalistic in its rendering and is carefully worked out on all four sides. For example, the right leg, the feet, and the twisted torso are extremely human. Even detail like the veins in the left arm and the left leg are depicted. Nonetheless the pubic hair remains depicted in the stylized diamond shape that is typical of late Archaic and Early Classical sculpture. There is a small circular hole at the base of the neck on the right side which served for the attachment of the sword belt. A large hole exists in the right pectoral muscle for an arrow.
The head of the warrior turns toward the left shoulder and tilts downward. It wears a type of Chalcidian helmet which has a neck guard and hinged cheek pieces. The right cheek piece has been attached by means of a peg method whereas the left cheek piece was nailed in; the nail is still visible. On the top of the helmet is a rectangular socket that is four centimeters deep. A crest, made separately, would have been attached here.
The only hair visible is that of the beard and the moustache. The beard, appearing out from under the helmet and cheek piece, runs evenly around the outer edge of the cheeks. It extends beyond the face both at the cheeks and the chin. The hair is rendered in fine parallel wavy strands. The moustache, dropping down from the upper lip, extends over the beard. No hairs are articulated in the moustache which remains a unified raised surface.
The face itself is mainly concealed by the beard and helmet. The eyes, appearing under the arches of the helmet, are ovoid and narrow with thick lids and pronounced tear ducts that are defined by an internal line as well as by the form of the lids. The mouth is open and the corners are raised in a grimace. The teeth appear between the lips. The lower lip is crescent shaped with a small slot on the center of the inner border.
Discussion:For a full discussion of the history, both ancient and modern, of the sculpture from the four pediments of the Temple of Aphaia at Aigina, see the entry concerning the central figure of Athena from the West Pediment (cat. A 29). The dying warrior of this entry came from the East Pediment which is stylistically later than the West Pediment in both its total construction and its individual figures. It features fewer figures (eleven rather than thirteen) and the action converges towards the center rather than move outward in small groups. The bodies and heads of the figures are more naturalistically and freely rendered.
A comparison of this figure with that of the figure of the dying warrior from the proper left corner of the East pediment of the Temple makes the point clearly. The movement of the West Pediment figure is posed, stiff, and upright. Moreover, he pulls the arrow out of his chest without any sign of pain. His face has a broad Archaic structure and an impenetrable expression that is dominated by the smiling lips and stylized tiers of curls that frame the brow. In contrast, the dying warrior of the East Pediment writhes in agony; his torso twists and his right leg is suspended in the air. Structurally he is not confined by the space of the pediment; his left leg and arm hang over it. His mouth grimaces and his teeth show. His beard hair is rendered in wavy lines.
The interpretation of the narrative of the East Pediment depends upon an archer (figure V) located one in from the proper left corner. This archer wears a lion skin on his helmet which identifies him as either Herakles or a son of Herakles. Since Herakles is known to have aided his friend and relation Telamon, the son of Aiakos, in the first siege of Troy, the pediment is usually interpreted as such. Furthermore, in this battle Herakles shot and killed with arrows the Trojan king Laomedon.
The dying figure under discussion here is located on the first two geison blocks of the proper right side of the pediment. He wears a long beard and is consequently an older man. Moreover, he has been shot by arrows that appear to have come from the archer with the lion skin on the other side of the pediment. In his final moment he writhes in agony and appears, with left arm and leg over the edge of the pediment, about to roll off the pediment. Given the beard and the fact that his death seems caused by arrows shot by a figure plausibly identified as Herakles, Ohly has identified this warrior as the Laomedon, King of Troy and father of Priam. Harrison, furthermore, has pointed out (in class) that Laomedon’s tomb was located at the lintel of the gate of Troy and had to be destroyed before the Trojan horse could be taken into the city. Thus, the illusion of falling off the pediment is doubly appropriate for a man who literally fell in first Trojan War and whose tomb was toppled off the gate in the second Trojan War.
Bibliography:D. Ohly,
Glyptothek Munchen: Griechische und romische Skulpturen (Munich 1972) pp.61-62 fig.XI
iscusses arrangement of the figures of the East PedimentD. Ohly,
Die Aegineten I. Die Ostgiebelgruppe (Munich 1976) pp.102-113 pls.64-72b
extremely detailed technical description of the figure who is identified as LaomedonH. Knell,
Mythos und Polis (Darmstadt 1990) pp.72-76
discussion of the East Pediment of the Temple of Aphaia at Aigina